
[vc_row][vc_column][vc_column_text css=”.vc_custom_1658320170972{margin-bottom: 0px !important;}”]Here, you can learn basic module in Magento 2, when you learn Magento 2 you need to learn Hello World basic module step by step and it’s mandatory.
Let’s start with different things to create a custom module in Magento 2:
First of all you need to set developer mode. So, check status for deploy mode it’s default, developer or production using below command line.
php bin/magento deploy:mode:status
If you see the default or production mode in your result then you can switch to developer mode using below command line:
php bin/magento deploy:mode:set developer
Now, you need to create Module Setup as per the following:
- Create Folder: app/code/VendorName/Helloworld
– Here VendorName is module namespace and Helloworld is module’s name. - Create module.xml file in app/code/VendorName/Helloworld/etc folder with the following code.
<?xml version="1.0"?> <config xmlns:xsi="http://www.w3.org/2001/XMLSchema-instance" xsi:noNamespaceSchemaLocation="urn:magento:framework:Module/etc/module.xsd"> <module name="VendorName_Helloworld" setup_version="1.0.0"></module> </config> - Create registration.php file in app/code/VendorName/Helloworld folder to register the module with the following code.
<?php \Magento\Framework\Component\ComponentRegistrar::register( \Magento\Framework\Component\ComponentRegistrar::MODULE, 'VendorName_Helloworld', __DIR__ ); - Now, open your terminal and run the following command in your Magento root folder.
php bin/magento setup:upgrade
- Make sure your module is installed or not with the following command and check your module with enable/disable list.
php bin/magento module:status
Or you can also check VendorName_Helloworld with value 1 in app/etc/config.php file.
Create the controller with the following step:
- Define the route with routes.xml file in app/code/VendorName/Helloworld/etc/frontend folder with the following code:
<?xml version="1.0"?>
<config xmlns:xsi="http://www.w3.org/2001/XMLSchema-instance"
    xsi:noNamespaceSchemaLocation="urn:magento:framework:App/etc/routes.xsd">
    <router id="standard">
        <route id="helloworld" frontName="helloworld">
            <module name="VendorName_Helloworld" />
        </route>
    </router>
</config>
Here, define the frontend router with frontName helloworld. frontName attribute as part of URL.
- In Magento 2 URL’s is:
<frontName>/<controller_name>/<controller_class_name>
- In Magento 2 URL’s is:
- Create index.php file in app/code/VendorName/Helloworld/Controller/Index folder with the following code:
<?php

namespace VendorName\Helloworld\Controller\Index;

use Magento\Framework\App\Action\Context;
use Magento\Framework\App\Action\Action;
use Magento\Framework\View\Result\PageFactory;

class Index extends Action
{
    protected $_resultPageFactory;

    public function __construct(
        Context $context,
        PageFactory $resultPageFactory
    ) {
        $this->_resultPageFactory = $resultPageFactory;
        parent::__construct($context);
    }

    public function execute()
    {
        $resultPage = $this->_resultPageFactory->create();
        return $resultPage;
    }
}
In Magento 2 every action has own class which implements the execute() method.
Create the block with the following code:
- Create Helloworld.php block file in the app/code/VendorName/Helloworld/Block folder with the following code:
<?php
namespace VendorName\Helloworld\Block;

use Magento\Framework\View\Element\Template;

class Helloworld extends Template
{
    public function getHelloWorld()
    {
        return 'Hello World!';
    }
}
Create the layout and template file with the following step:
- Here, three subfolders inside the view(app/code/VendorName/Helloworld/view) folder: adminhtml, base and frontend.
- Create helloworld_index_index.xml file in the app/code/VendorName/Helloworld/view/frontend/layout folder with the following code:
<page xmlns:xsi="http://www.w3.org/2001/XMLSchema-instance" layout="1column"
    xsi:noNamespaceSchemaLocation="urn:magento:framework:View/Layout/etc/page_configuration.xsd">
    <body>
        <referenceContainer name="content">
            <block class="VendorName\Helloworld\Block\Helloworld" name="helloworld" template="helloworld.phtml" />
        </referenceContainer>
    </body>
</page>
Our controller handle is helloworld_index_index. You may create the layout configuration file for every layout handle.
- Create helloworld.phtml file in the app/code/VendorName/Helloworld/view/frontend/templates folder with the following code:
<h1><?= $block->getHelloWorld(); ?></h1>
- Create helloworld_index_index.xml file in the app/code/VendorName/Helloworld/view/frontend/layout folder with the following code:
Run the Magento Upgrade and cache clean command as per following:
php bin/magento setup:upgrade
php bin/magento cache:clean
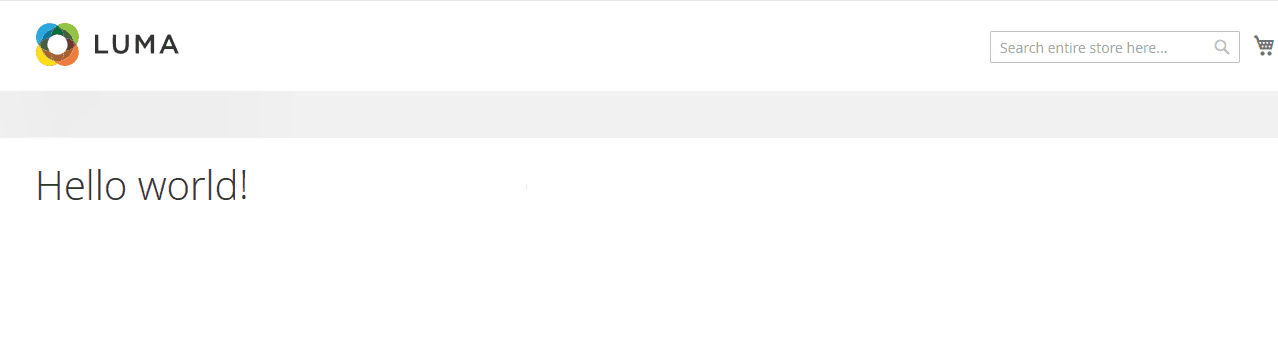
Now, open the URL yourdomain/helloworld/index/index in your browser and you should get something like this:
We hope our technical blog which looking is very helpful for you. If you have any queries, feel free to leave a comment below.


Leave a Reply